Roof Overhang To Show Dashed In Plan Revit

How To Show A Roof Overhang In A Plan View With Revit Roof Overhang How To Plan Roof

Solved Roof Above How To Show Dashed Lines Autodesk Community Revit Products

Revit 2013 Stair Arrows Stairs Arrow Floor Plans

Color Schemes In Reflected Ceiling Plans Ceiling Plan Color Schemes How To Plan

Revit Architecture Showing Overhead Lines On Your Plans Bimscape
How To Show A Roof Overhang In A Plan View With Revit Imaginit Building Solutions Blog

When a dashed line is displayed on the exterior of the wall click to place the roof line.
Roof overhang to show dashed in plan revit.

Wall By Face Part 2 Creating A Slanted Wall Tool Wall Create Face

Revit Tip Visualising Revit Constraints Autodesk Revit Visualisation Autodesk

Renumber Doors By Rooms Revit Architecture Doors Room

Pin On Revit Revit Lt

Pin On Revit Revit Lt

Revit Show Hidden Tool Different Example Blog Micorgraphics

3 Benefits Of Using Revit View Filters Cadnotes Filters Doors And Floors Views

Solved Displaying Masses In Floor Plans Autodesk Community Revit Products

Adding Ramp Slope Arrow And Stair Path Arrow Learn Revit Layout Architecture Concept Architecture

Organizing Schedules In Revit Project Browser Browser Organization Schedule

Linked Grids And Levels Grid Levels Bar Chart

Dynamo Simple Practical Examples Draw A Revit Wall

Revit Hatching Pattern Line Weights Pattern Pattern Fashion Surface Pattern
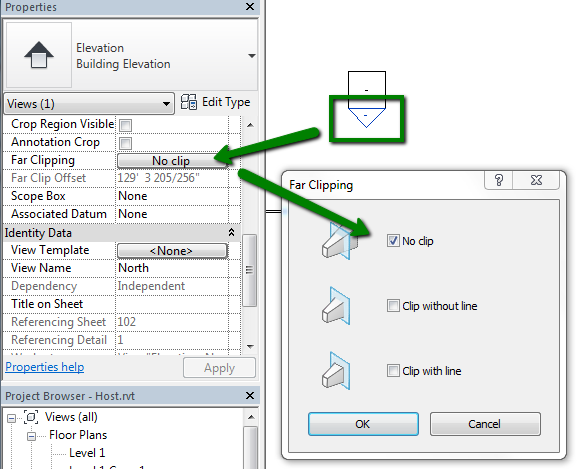
Levels Are Not Visible In Section Or Elevation Views In Revit Revit Products Autodesk Knowledge Network

Section Boxes In Orthographic Perspective Views Views Perspective Box

The Bim Jedi Formally The Revit Jedi The 8 Worst Things You Can Do In Revit

Imaginit Revit Utilities Excel Link For Rooms Excel Room Latent Heat

Pin On Revit Revit Lt
Https Encrypted Tbn0 Gstatic Com Images Q Tbn 3aand9gcrfi Pzxzw59telpx4ollioyhcgpjug8pffekg2txmasbpwndqr Usqp Cau

Revit Step By Step Overhead Linework Youtube

Pin On Revit Revit Lt

Revit Schedule Column Totals And Rounding Column Schedule Decimals

Revit User Interface Ribbon Appears Blank For Some Tabs User Interface Autodesk Revit Interface

Foundation Walls Wall Function Bd Mackey Consulting The Revit Geek Blog Foundation Wall Function
Source : pinterest.com
